870 20ga camo paint job
After a trial run on a single shot I had, I finally got the nerve to paint my brand new TSS slinger. I am happy, I think it turned out pretty good for a rookie painter. I hunt in a lot of pines and thick bottoms, so that is kind of the theme I was trying to go with. I went with a khaki base and earth brown and forest green to keep it on the darker side.
- GOLD HUNTER
- Gobbler Nation
- Posts: 4595
- Joined: September 1st, 2011, 10:07 pm
- Location: BIG LICK VA.
- Shooter
- Gobbler Nation
- Posts: 5488
- Joined: April 19th, 2012, 1:29 pm
- Location: Deep South, Middle, TN
Re: 870 20ga camo paint job
Not too shabby,.... actually, pretty dam good and neat pattern!!!
Re: 870 20ga camo paint job
That will blend in good, don't lay it down,,,lol
I was not his father but he was my son,,MAK IV, 10-15-1993 - 4-22-2007
"Rest in Peace my Little Buddy"
- CamoMan4025
- Gobbler Nation
- Posts: 4235
- Joined: August 31st, 2011, 11:51 am
- Location: Shenandoah Valley, VA
Re: 870 20ga camo paint job
Sweet paint job. Now you can lay em down........they will never see you coming!
"God, Guts & High Explosives"
Re: 870 20ga camo paint job
That Looks Great ! Well Done !
vaturkey
vaturkey
Re: 870 20ga camo paint job
Looks great
Re: 870 20ga camo paint job
Nice job. Rattle cans and natural grass as stencils?
Re: 870 20ga camo paint job
I used pine boughs for a stencil. I'll give a short version of what I did for those that may think of trying it. I used Krylon camoflauge paints in khaki, earth brown, and forest green. Valspar flat clear coat. I have about $25 in the whole job.GLS wrote:Nice job. Rattle cans and natural grass as stencils?
I broke the gun down and cleaned every thing that was going to be painted with acetone and a clean rag. I wore powder free rubber gloves while doing this so as to not get any oil off my hand on the newly cleaned surface. I then taped off all the areas that were not be painted, again wearing gloves. This is the most time consuming part. Take it slow here. When you think its clean, clean it again. And again. If it's not cleaned right and all the oils removed the paint will not stick.
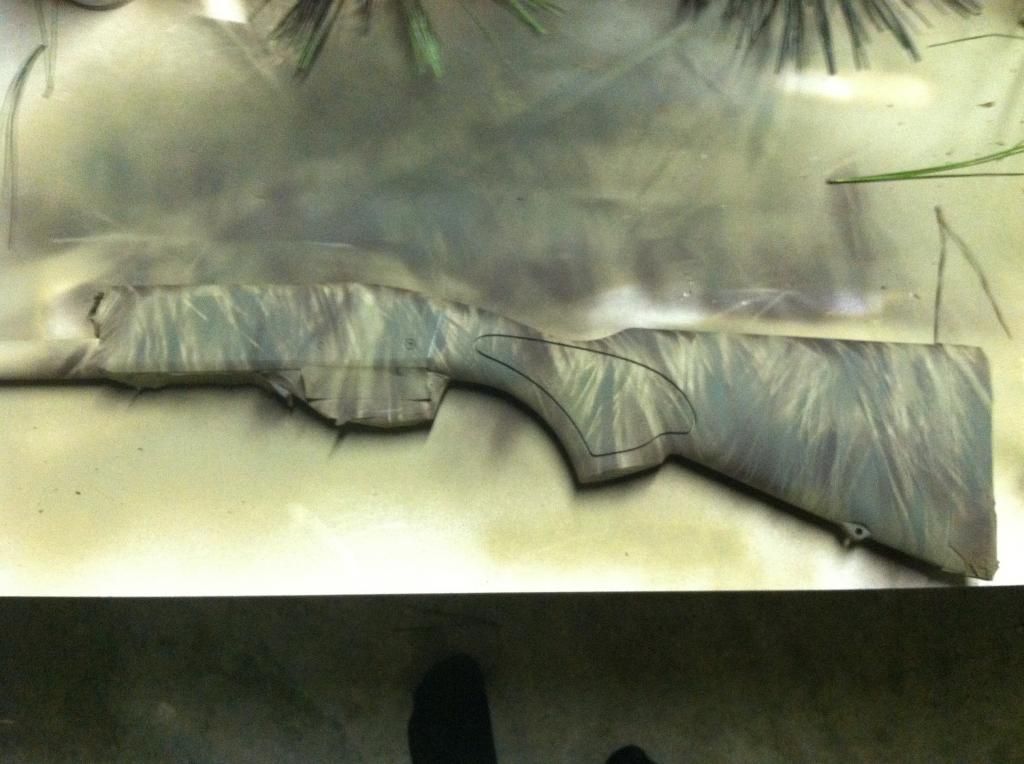
I then laid down as a base coat the lightest color, which was my khaki. It has about 3 coats before it had even coverage. Using a hair dryer or box fan will expedite the drying, just make sure it is dry before laying down the next coat. The pic below is after one coat. I didn't take a pic after full coverage for some reason.
After the base coat was dry, I came back with my earth brown. I laid the pine bough up to the gun and shot it at about 3" off the gun. The closer the paint is shot the more defined the lines are. The further away you hold the can the more blurry a line will be. I just shot a line down the gun and repeated till I got the coverage and pattern I wanted.
After the brown was dry, I came back and did the same thing with the forest green.
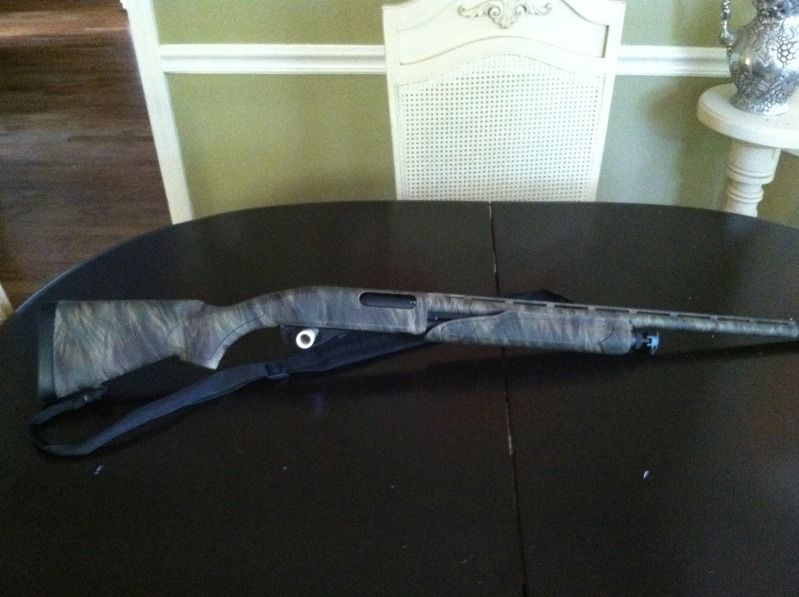
After all the pieces were dry, I cleared it with several coats of Valspar Flat clear coat. Once dry I re-assembled the gun. I debated on whether to clear it or not, but on my test gun I didn't and the painted didn't hold up well. I am pleased with the durability so far of this job since I cleared it. I will add, the Valspar flat once dry there was a minor sheen. Most wouldn't have cared but it bothered me. I used some 400 grit sandpaper and lightly sanded it. This took the sheen out. I oiled her up and she is ready to hunt.
Re: 870 20ga camo paint job
Nice job! Looks good.
Re: 870 20ga camo paint job
When I did a single-shot 20 gauge project last summer, I tried painting after degreasing with brake cleaning fluid and didn't get a satisfactory bond with Krylon primer and paints. I ended up sanding it all off down to bare metal, re-primed, painted and it is far more durable than before. Hope yours works out for you. One thing about the rattle-can finishes is that they are easily repairable and cheap to do. No two jobs are alike...
Re: 870 20ga camo paint job
That looks awesome!!!!
sent from Tim's Tweaked Out Evo
Re: 870 20ga camo paint job
Looks great, I sure as heck couldn't do it...
Re: 870 20ga camo paint job
You did a great job
I may not be smart but I can lift heavy objects
I have no need for a 30-06, I have a shotgun
- Stinky J Picklestein
- Gobbler Nation
- Posts: 1731
- Joined: July 29th, 2011, 1:12 pm
Re: 870 20ga camo paint job
That looks fantastic!
- Grizzly Johnson
- Posts: 81
- Joined: September 10th, 2011, 10:44 pm
Re: 870 20ga camo paint job
Very well done, looks GREAT!!!
Revenge is an act of passion; vengeance of justice. Injuries are revenged; crimes are avenged.
- FireDoc
- Posts: 108
- Joined: November 10th, 2014, 8:45 am
- Location: Calling Michigan Longbeards across fields.
Re: 870 20ga camo paint job
Looks fantastic!
-
- Posts: 4
- Joined: June 14th, 2016, 10:52 pm
Re: 870 20ga camo paint job
Looks great
- hookedspur
- Gobbler Nation
- Posts: 2370
- Joined: May 24th, 2012, 8:44 pm
- Location: Ohio
Re: 870 20ga camo paint job
Very nice job !
Re: 870 20ga camo paint job
Someone has been spelunking the old threads for this one--OP is almost three years ago.
This is a good place to repost this info from a professional painter and his advice on rattle-can jobs. The big points are attention to preparation and allowing the paint to cure for at least a month (if you can) before use. Here’s what he had to say:
"Thanks for answering my question and I'll explain why I asked you. I'm a bodyman/painter by trade, I've been doing it for about 20 years. I've mainly made my living doing custom work like airbrushing, handlettering, pinstriping and graffics. Bikes, brain buckets, boats, etc. I experimented A LOT with different types of paints over the years for different types of appilcations. I'm telling this about myself so you don't think I'm some Joe-Blow giving bad advise about paint, which I see plenty of on this forum. So when ever I see someone having a paint related problem, I usually like to chime in and give my two bits.
I've never used Rustoluim BBQ paint myself, but what happened to your paint job I don't really think can be blamed on the paint itself. I'm assuming that the BBQ paint is probably an enamel based product and when it was fully dried it would have stood up to giving it a quick wipe down with oil. I think you just did it too soon, the oil started breaking down the paint and interrupted the drying/curing process. That's probably why it continued to leave black on your hands for days after.
I'll give you guys a little painting 101. There basically two types of paint out there, one-part and two-part paints. One part-paint is a paint that dries through evaporation; the one-part means there is nothing to add to it, the one-part is the paint itself. Two-part paints cure through a chemical reaction, they have to have an activator(also known as hardener or catalyst) to make them cure. The first-part is the paint and the second-part is the activator. One-part and two-parts apply to all paints weather it is latex, laquer, enamels, urethanes or epoxys. Two-part paints with be more durable in the long run and will be highly solvent resistant compared to one-part paints. Notice I said one dries and one cures...
But not everyone wants or is going to spray two part-paints, esp when spray bombs are quick, easy and cheap. But I'll give you guys a few pointers to make spray bomb paint fairly durable.
I noticed a few people were saying that Rusty brand BBQ scratches easily and flakes off. I'm guessing people are spraying it over bare metal, even if the directions say you can, it's probably not a good idea. As far a I know, there is no true DTM(direct to metal) paint on the market in a spray can. You have to get into two-part paints for a true DTM paint, even then it's not always 100% it's not going to flake off. Check out local auto-body supply stores and look for metal-etching primer in the spray can, it's usually farily cheap and it goes a long way.
Here are some simple steps to make sure your paint job will turn out great.
1-Degrease. Do this as many times as nessecary, also never let the degreaser dry. Wipe the excess off or blow off with compressed air.
2- Scuff/sand areas really well.
3-Blow off with compressed air; if you don't have an air compressor, compressed air in a can works very well(the stuff from computer stores).
4-Tack surface
5-Etch prime all bare metal.
6-Spray paint according to diections.
7-Let it become dry to the touch.
The last step is the hardest step of all, but simply put...KEEP YOUR HANDS OFF IT FOR 2-3 WEEKS, even better a month. I know this part is espially hard when you just got done building your new gun. Even two-part paints take 3-4 weeks to FULLY cure. I like to paint snowmobile hoods during the summer and bike tanks during the winter, it gives the paint time to fully cure and give the customer their moneys worth. But it is the hardest thing to get through to my customers; when it gets all nice and warm, that's when everyone wants their bikes painted."
Gil
Re: 870 20ga camo paint job
Awesome job!
-
- Posts: 11
- Joined: August 29th, 2015, 5:27 pm
Re: 870 20ga camo paint job
That looks great!
Re: 870 20ga camo paint job
That turned out pretty good. I got a couple that I need to do. My Mossberg 500 12 gauge and a Stevens 320 12 gauge. The Mossberg is camo but, chipped in places bad, and the Stevens is all black.
"I live in America, why do I have to press 1 for English?"